Installation Guides (MacOS)
- VPN for Mac
- Install Printers on macOS
- Configure the network for VPN
- MacBook Install Guide for Vogelwarte Devices
- SMB Client on macOS
- Problem after Active Directory (Windows/entra) Password change
VPN for Mac
For using VPN on Mac you have to install the Sophos Client Authentication Agent and the FortiClient! For both you need to Device to connect with LAN cable inhouse!
I'm not sure if the FortiClient needs the Sophos Client Authentication Agent! But for security reason we need the Sophos Endpoint Protection Software:
Sophos Endpoint Protection
- Download zip-file from
smb://vogelwarte.ch/dfs/Teamwork/IT/SophosInstall.zip - Install the Sophos Installer.app
- Follow this guide to enable all required permissions for Sophos: https://docs.sophos.com/central/customer/help/en-us/PeopleAndDevices/ProtectDevices/EndpointProtection/MacSecurityPermissions/index.html#grant-permissions-for-scanning-and-web-protection
FortiClientVPN Installation
- Download the VPN client software: FortiClient Onlineinstaller / Updates.
- Install it - Zertifikat should be automatically installed (or not needed)
- You need to allow in the System Settings following entries:
- Switch off all Inhouse Network LAN and also WLAN "Vogelwarte" or "VoWa_public"
FortiClient uninstall
The problem is that the Uninstaller is only working if FortNet is not running. You have to run the MacOS in the Safe Mode
Safe Mode procedure
- Shutdown
- Press Power Butten for long time till "System ..." appears
- Press on "HardDrive" symbol
- Press on Shift and then the "click"-button changes to "...start into Safe Mode..."
- The system starts into the safe mode
- Now you can run the "Uninstaller"
- Reboot the machine
Install Printers on macOS
If your Mac is part of the Vogelwarte AD, you can skip the manual installation and just install the printer's drivers! You should directly find the printers in the macOS settings with PRINTSERVER2019-<YOUR PRINTER>!
Download Required Printer Drivers
Note: These drivers worked at the time of writing. The links might be outdated, thus make sure to download the most recent printer driver.
| Make | Model | Driver |
|---|---|---|
| HP | HP LaserJet M606* | HP Easy Admin |
| Canon | Canon iR-ADV C5840/5850* | PS Printer Driver & Utilities for Mac |
* The driver is generic and spans several models
Manual Installation of Printers
This guide helps you to set up a printer manually, e.g. when your device is not part of the Vogelwarte AD
Prerequisites
To install the printer, please note down the following information:
-
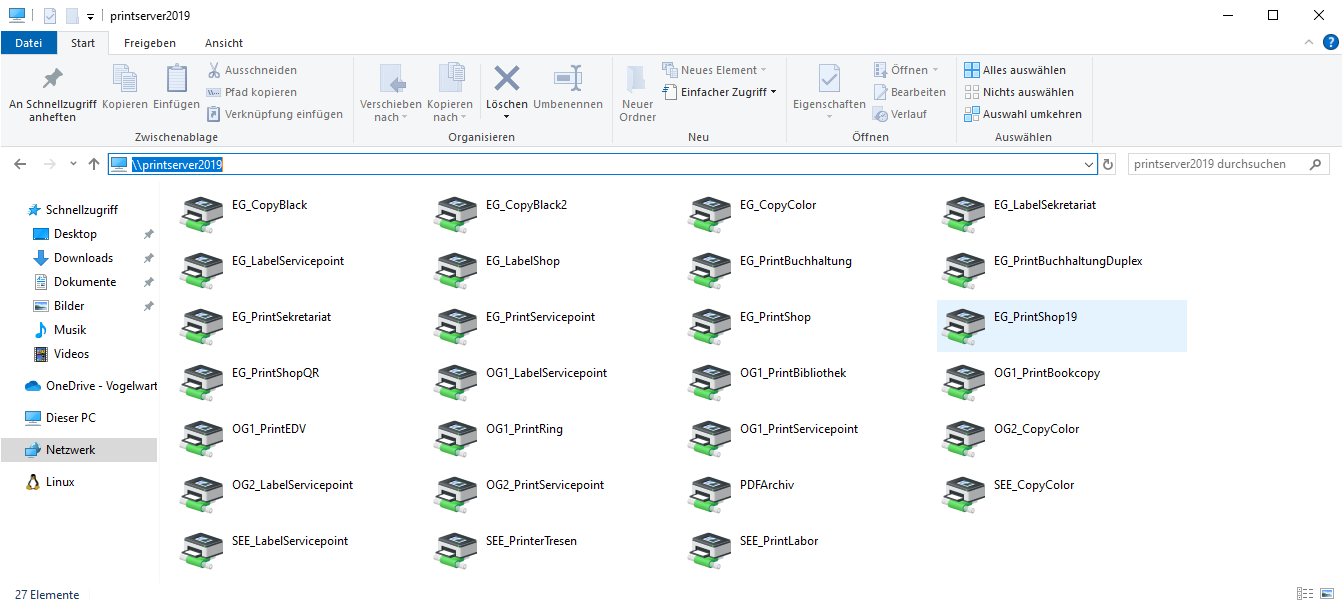
Name of the printer at Vogelwarte (e.g. OG1_PrintEDV)
- This information can be found on a Vogelwarte Windows computer by connecting to
\\printserver2019in Windows Explorer.
- This information can be found on a Vogelwarte Windows computer by connecting to
-
Make and model of the printer
Step-by-step Guide
-
Download and install the driver for the specific printer model from the manufacturers website. You can find some hints for some models in the Table below.
-
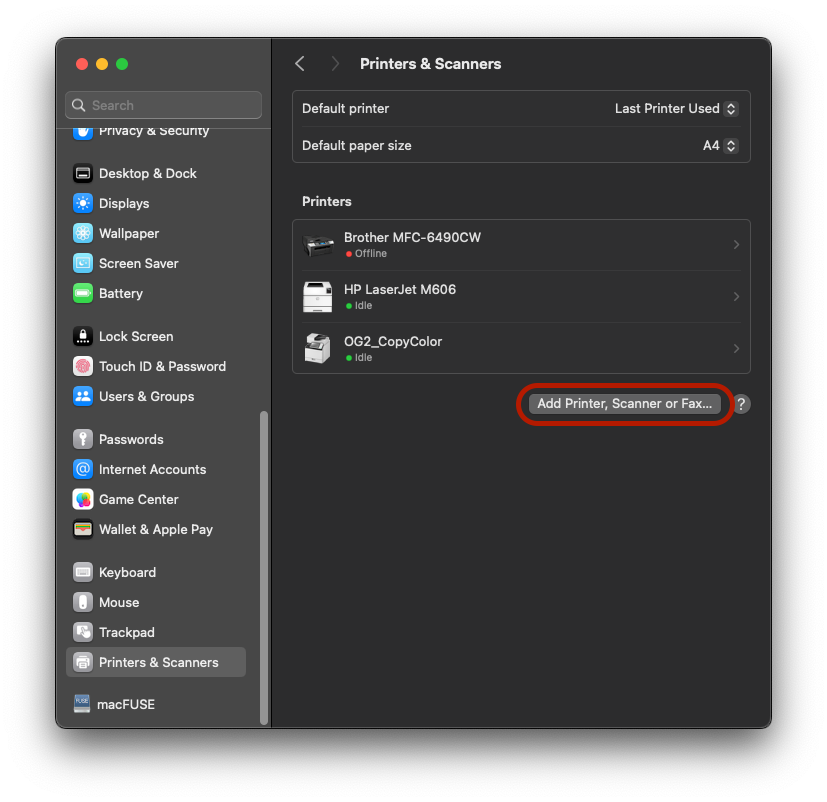
In the macOS Settings app, go to Printers & Scanners and click Add Printer, Scanner or Fax

-
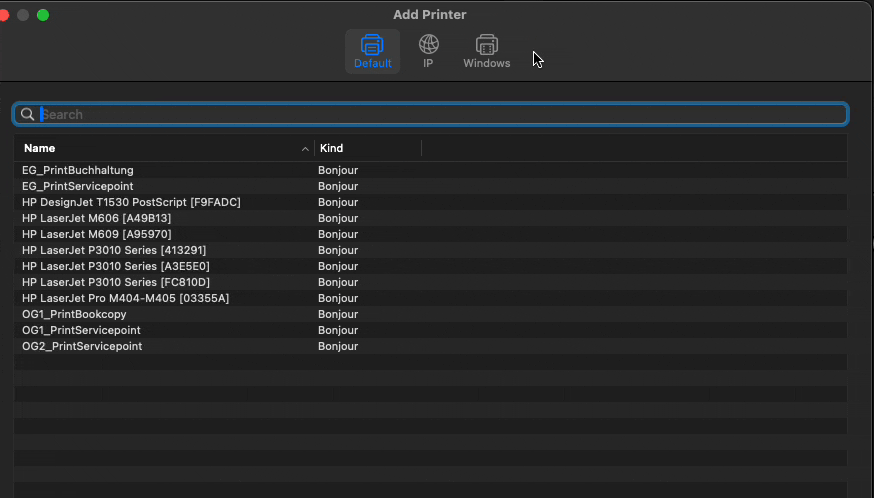
In the Add Printer dialogue, right click anywhere in the Toolbar and select Customize Toolbar. Then drag and drop the Advanced icon into the toolbar.

-
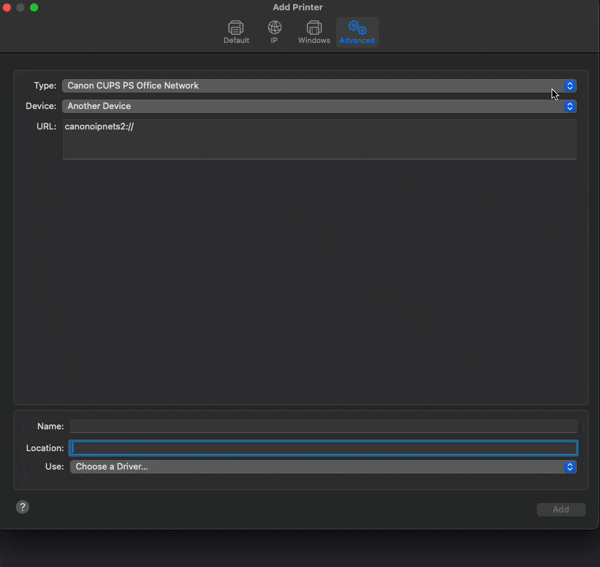
Next, select Windows printer via spoolss as Type and enter the printers URL as
smb://printserver2019.vogelwarte.ch/<Printer Name>as shown below. Also, make sure to set an appropriate name (+optionally the location), as well as to select the correct driver in the Use dropdown (you might have to search for it). Then, click add.
-
If you wish, make a test print e.g. from https://continuousinksupplysystem.com.au/pdf/print-testing-tools-MIR.pdf. Make sure to select the correct paper size A4, which sometimes get set to US Letter.
Configure the network for VPN
For various internal services, e.g. QGIS plugins, a standard domain vogelwarte.ch must be specified in the network settings.
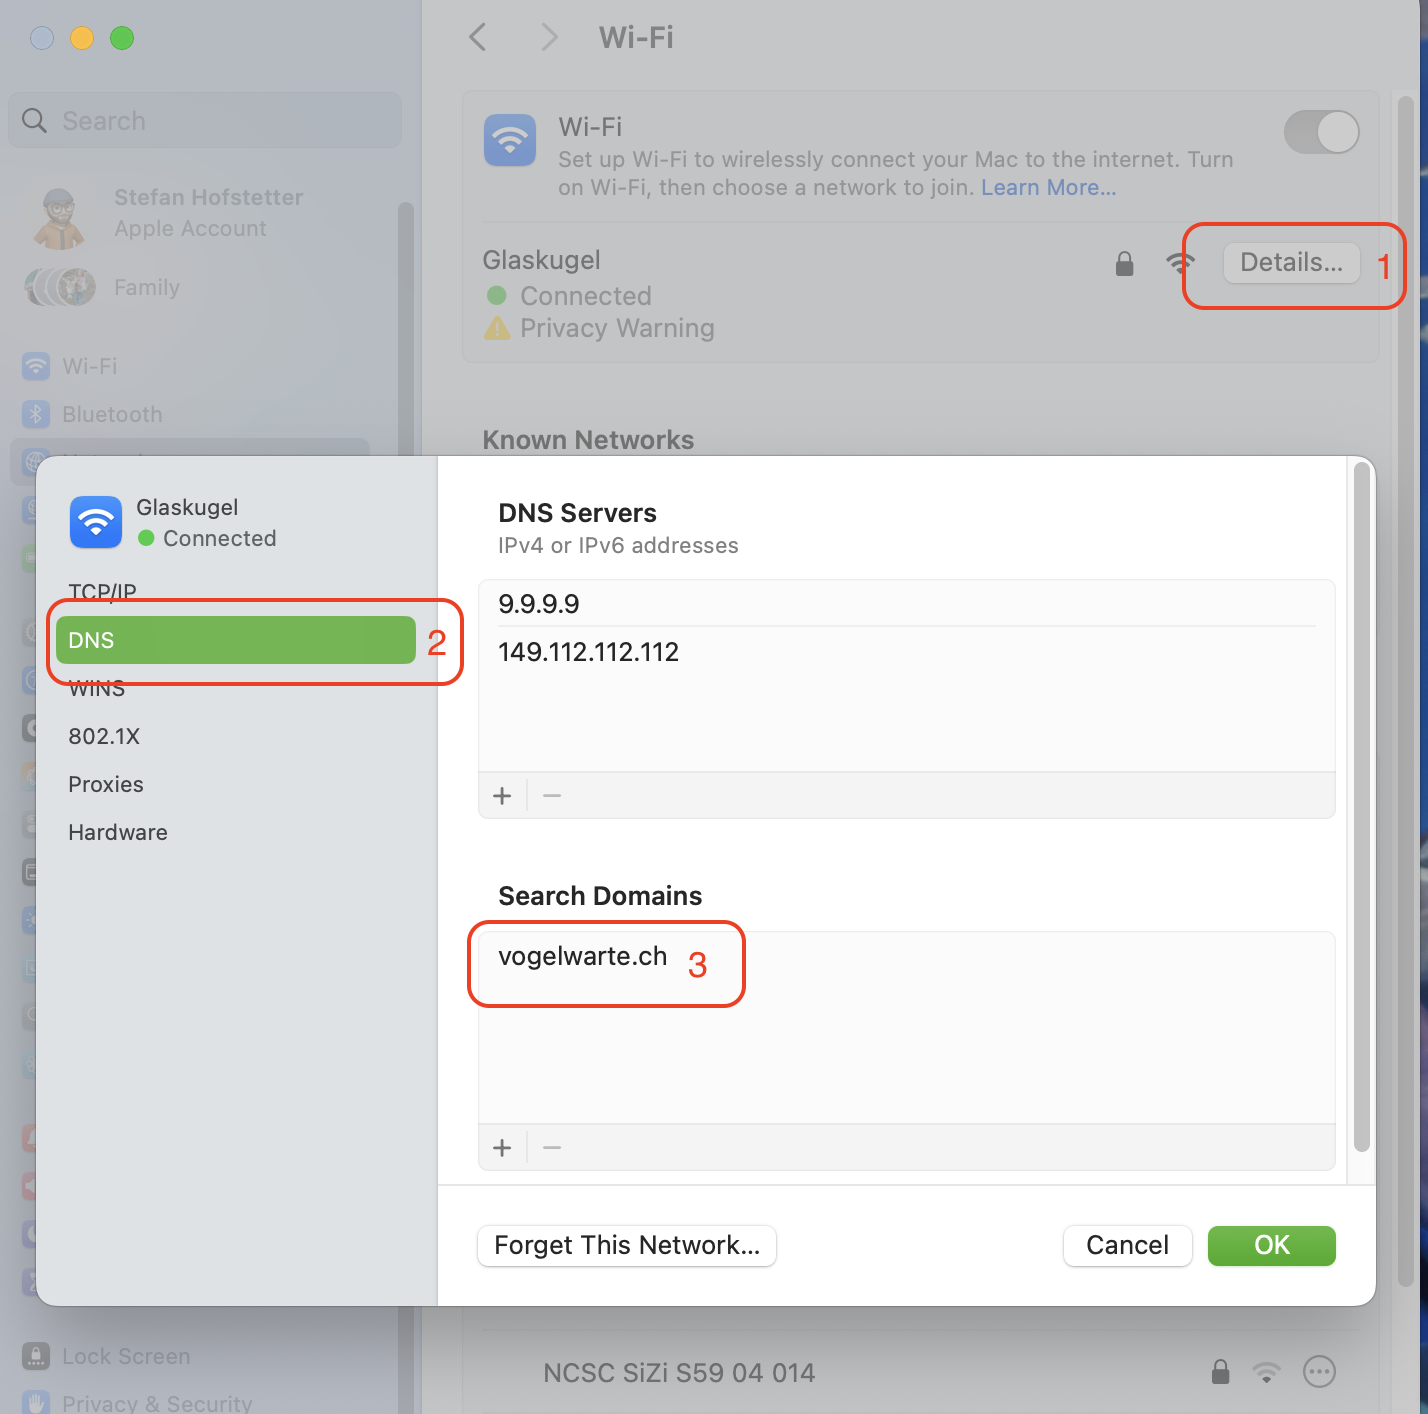
- Go to the Network details
- Select DNS on the left side
- In Search Domains add
vogelwarte.ch. You have to press + on the bottom of the listbox.
MacBook Install Guide for Vogelwarte Devices
This setup works for macOS Tahoe
Manual Setup (until we have a MDM)
Prerequisites:
You need to be in Sempach at a staging docking station to have access to the internal network
Step 1: Out-Of-The-Box Setup Guide
Follow the setup guide and create a user Scientific IT (UNIX username "scientific.it") with the password from Bitwarden ("Mac Laptop Admin Login"). Disable Location Services, disable Siri, disable analytics, skip Touch ID, skip Apple Account.
Step 2: Install Updates or update to macOS Tahoe
Go to system settings and check for updates. So far, M4 devices were still shipped with macOS Sequoia 15. Thus an update to macOS Tahoe is necessary. Proceed with said update.
Step 3: Enable FileVault encryption
Step 4: Install Sophos and FortiVPN
Conect to smb://vogelwarte.ch/dfs and navigate to Teamwork > IT and copy the FortiVPN online installer & SophosInstall folder to the machine. Install Sophos. During the installation you will be prompted to enter the password multiple times to enable extensions. Additionally you need Full Disk Access for multiple Sophos services. In Sophos Endpoint Self Help under Prerequisits, you find an icon to drag & drop to the Full Disk Access Setting in macOS which makes this setup easier.
Next, install FortiVPN. The configuration of FortiVPN is done in a later step.
Step 5: Install M365 Apps
Download Office Apps from microsoft.com. You can temporary login with your Vogelwarte account. Install pending updates with the Microsoft AutoUpdate app. Do not open the apps yet.
Step 6: Connect to AD
- Find the WissIT AD Admin in Bitwarden
- Open "Directory Utility"
- Unlock and double click on Active Directory in the service list.
- Enter the following
- Active Directory Domain: vogelwarte.ch
- Computer ID: <desired computer ID>
- In advanced options > User Experience : Check "Create mobile account at login" & "Require confirmation before creating a mobile account"
- In advanced options > Administrators > Preferred Domain Server: dc01.vogelwarte.ch
- Click Bind, you will first be asked for the local admin password and then for the AD admin account. Enter those details. Wait for activation
- Log out
- Now log in with your (or the owners) Vogelwarte account. You'll be asked to create a mobile account. If the laptop is for you, click yes, if not, do not create one. Mobile accounts are accounts which remain on the device and are useful if you want to keep the account on the machine.
- If you set up a mobile account, you will be asked again for the scientific.it password to unlock the boot drive encryption (FileVault) with the new account.
- Once the account setup is done make sure to enable admin rights for the new account
Step 7: Install Printers
Install the most recent drivers for macOS
| Make | Model | Driver |
|---|---|---|
| HP | HP LaserJet M606* | HP Easy Admin |
| Canon | Canon iR-ADV C5840/5850* | PS Printer Driver & Utilities for Mac |
For the label printers, the drivers are already preinstalled on macOS
SMB Client on macOS
Settings for the macOS smb client
- Create the file
/etc/nsmb.conffile with the following content
[default]
streams=yes
notify_off=yes
soft=yes
port445=no_netbios
protocol_vers_map=6
mc_on=yes
mc_prefer_wired=yes
dir_cache_max_cnt=0
- In a terminal, execute
sudo defaults write com.apple.desktopservices DSDontWriteNetworkStores -bool TRUE. This disables the creation of .DS_Store files on network shares - Restart the machine
- Reconnect all smb shares afterwards.
Details of the /etc/nsmb.conf settings
| Setting | Value | Description |
|---|---|---|
streams |
yes |
Enables support for NTFS alternate data streams, allowing macOS to read and write metadata and resource forks on SMB shares that support this feature [^1]. |
notify_off |
yes |
Disables file and directory change notifications from the server, which can reduce network traffic and prevent unnecessary refreshes in Finder [^4]. |
soft |
yes |
Configures soft mounts, meaning that if the server becomes unresponsive, operations will fail quickly instead of hanging indefinitely, improving user experience during network issues [^1]. |
port445 |
no_netbios |
Specifies that connections should use direct TCP on port 445 without falling back to NetBIOS over port 139, streamlining the connection process [^2]. |
protocol_vers_map |
6 |
Sets the SMB protocol version compatibility bitmap; 6 to force SMB 2 or 3 only [^3]. |
mc_on |
yes |
Enables SMB Multichannel, allowing multiple connections between client and server to increase transfer speeds and provide redundancy [^7]. |
mc_prefer_wired |
yes |
When SMB Multichannel is enabled, this setting prioritizes wired network interfaces over Wi-Fi for better performance and stability [^5]. |
dir_cache_max_cnt |
0 |
Disables local caching of directory listings, ensuring that you always see the most current files and folders on an SMB share [^6]. |
After modifying /etc/nsmb.conf, disconnect and reconnect any mounted SMB shares for the changes to take effect [^8].
[^1]: MacOS und SMB nerven | Das deutsche Synology Support Forum
[^2]: nsmb.conf(5) man page
[^3]: How to disable SMB 1 or NetBIOS in macOS
[^4]: DSM 7.2 - Dateien erscheinen nach dem Löschen wieder und lassen...
[^5]: Das Verhalten von SMB Multichannel konfigurieren - Apple Support (LI)
[^6]: Disable local SMB directory enumeration caching
[^7]: Configure SMB Multichannel behavior
[^8]: Apple macOS smbx and /etc/nsmb.conf information - GitHub
Problem after Active Directory (Windows/entra) Password change
When I changed my ActiveDirectory password on the MacOS - everything worked. OK, I had to give the new password on serveral Online Services from Microsoft365 and I've to restart my Teams and so on... But one problem on MacOS keept me a little bit stocked.
The passwords on MacOS are stored in the Keychain Access Tool and is encrypted with the AD password and this is not changed automatically - so you have to change it manually:
Type into a Terminal:
security set-keychain-password
And you have to enter the old and then the new Active Directory Password.